Guide
Resources
Custom In-Space Resources
Lessonspace provides a resource library that can be used by teachers to insert content into a space. Usually it comes pre-filled with some useful content, and it can be updated by using the Library tab from your dashboard. It's also possible to provide a custom API endpoint from which the resource library will fetch data from.
Authentication & CORS
CORS Setup
You'll need to ensure your endpoints all allow CORS access for go.room.sh, and you may need to allow some specific headers if you choose to use the header method below.
Using Headers, the JWT and the Room secret
Each request will contain two headers:
X-Holodeck-JWTThe current user's JWT which is signed with the space (secret returned by the Launch API).X-Holodeck-RoomThe current space ID. This is Lessonspace's internal UUID that you get back from the Launch API.
You can use these to validate the provided JWT against the returned secret to ensure the user has the expected permissions.
Access-Control-Allow-Headers: X-Holodeck-JWT, X-Holodeck-Roomcustom_jwt_parameters parameter set as appropriate.Supported File Types
The resource library currently supports three types of files:
- Images (.png, .jpg, .svg)
- Exported Lessonspace ZIPs
- PDFs
The three APIs required
The resource library works in three steps. On page load, a GET request is done to fetch a list of tabs and the URL associated with each one.
When the resource library is opened, two GET requests are made to the folder and tab endpoint respectively. The tab endpoint is just the URL specified in the tabs response, while the folders endpoint will have /folders/ appended to it.
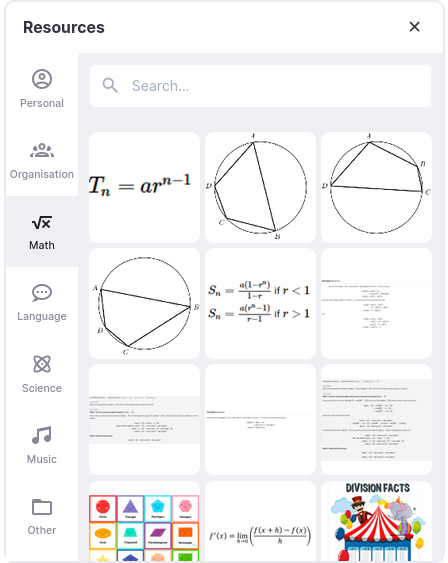
Step 1: The Tabs Endpoint
This is a listing of all the tabs to display for the library. These are presented across the left hand side of the screen, such as "Personal", "Organisation" in the screenshot above. The JSON payload needs to be an array of objects, each having a title, an icon (which will be an SVG) and a URL.
Your endpoint needs to return data that looks like:
[
  {
    "id": string | number,
    "title": string, // "Math Resources"
    "icon": string, // An SVG icon, e.g. "<svg xmlns=\"http://www.w3.org/2000/svg\" xmlns:xlink=\"http://www.w3.org/1999/xlink\" version=\"1.1\" width=\"24\" height=\"24\" viewBox=\"0 0 24 24\" fill=\"currentColor\">...</svg>"
    "url": string, // "https://example.com/path/to/tab/endpoint"
    "foldersUrl": string // Optional, if not provided, we use the url + 'folders/'
  }
]
Step 2: The Folders Endpoint
This endpoint is optional, but necessary if you want to enable folder support. Currently folders can only be one level deep and are displayed at the root of each tab.
Given the tab endpoint from the above example, it will do a GET request to the foldersUrl, if it is defined, otherwise, it will automatically be computed as url + 'folders/', e.g. https://example.com/path/to/tab/endpoint/folders/.
The URL will always be requested every time a tab is opened. If you don't want to support folders, just ensure the URL returns a 404 response code.
When a folder is selected, the ID will be included as the folder query parameter in the request to the files endpoint as described in Step 3 below.
Your endpoint needs to return data that looks like:
{
   "count": 1,
   "next": null,
   "previous": null,
   "results":[
      {
         "id": 106,
         "name": "New Folder"
      }
   ]
}
Step 3: The Files Endpoint
The files endpoint is the main endpoint that returns the list of files in the tab/folder. Given the example in Step 1 above, a GET request would be made to https://example.com/path/to/tab/endpoint with the folder, search and page query parameters. folder is the id of the selected folder (or none), search is the current search string (or none) and page is the page UUID.
Pagination is up to your API. If you return fewer items in the results array than the top level count, a 'Load More' button will be displayed until the total fetched results equal the count.
Your endpoint needs to return data that looks like:
{
   "count": 85,
   "next": null,
   "previous": "https://example.com/path/to/tab/endpoint/?page=1",
   "results": [
      {
         "id": string | number, // Ensure this is unique with the results set
         "name": string, // e.g. "Resource Name"
         "type": "image" | "zip" | "pdf", // This will send the file to the correct conversion service so ensure this is accurate
         "source": string, // e.g. "https://example.com/files/xyz.jpg"
         "thumbnail": string, // A base64 encoding of the image thumbnail
         "includeAuthHeaders": boolean // Optional, this will include the X-Holodeck-JWT and X-Holodeck-Room headers when requesting the file from the `source` URL when the file is selected by the user to be inserted
      }
   ]
}
Using Your Custom Library
With the above endpoints done, you can pass in your tabs endpoint (from step 1) to the Launch API by setting the top level resource_url parameter.
When debugging and developing, you can also change the query parameter resource on the client_url (go.room.sh) URL directly.